Google Colaboratory でグラフを作成しツイートをする

Google Colaboratory でグラフを作成し、ツイートをする
Google Colaboratory → https://colab.research.google.com/?hl=ja#
自分用の備忘録なので雑です。すいません
事前準備
Twitter Developerアカウント
Twitter APIの認証情報(consumer_key、consumer_secret、access_token、access_token_secret)を取得するには、Twitter Developerアカウントを作成し、Twitterアプリを作成する必要があります。手順は次のとおりです。
-
https://developer.twitter.com にアクセスして、Twitter Developerアカウント(まだ持っていない場合)を作成します。
-
Twitterアプリを作成する手順:
- 左側のナビゲーションメニューから「Apps」メニューアイテムをクリックします。
- 「Create an app」ボタンをクリックします。
- 「Create an App」フォームの必須フィールドに記入します。
- Developer AgreementとPrivacy Policyを読んで受け入れます。
- 「Create」ボタンをクリックします。
- アプリを作成したら、「Keys and Tokens」タブに移動してAPIキーとトークンを生成します:
- 「Consumer Key」と「Consumer Secret」のセクションの「Generate」ボタンをクリックしてこれらのキーを生成します。
- 「Access Token & Access Token Secret」のセクションの「Generate」ボタンをクリックしてこれらのトークンを生成します。
- この認証情報はTwitterアカウントへのアクセスを許可するため、安全に保管する必要があります。誰にも共有しないでください。
注:API認証情報はいつでも取り消されたり再生成される可能性があります。認証情報に問題がある場合は、再生成する必要があるかもしれません。
elevated設定
elevated設定が必要です。以下が参考になりました。
私の場合は1日程度かかりました。申請して1回質問が来て回答して完了。という感じ
アプリケーション権限
権限が「Read Only」となっている為、「Read and Write」もしくは「Read, Write and Access direct messages」に変更する必要がある。
Twitter Developerアカウントでのアクセス許可の設定は以下の手順で行います。
- Twitter Developerアカウントにログインします。
- Apps セクションに移動します。
- 生成したアプリケーションを選択します。
- [Permissions]タブを選択します。
- [Read and Write]または [Read, Write, and Access Direct Messages]のいずれかを選択します。
- [Update settings]ボタンをクリックして変更を保存します。
これで、Twitter APIを使用するアプリケーションにアクセス許可を与えることができます。
これまでに作成した記事の延長で今回は臨みます
IC NFTトランザクションデータをグラフにする
前回記事の内容を参考にIC NFTデータを抽出
!rm -r nfts_data
!git clone https://github.com/lukasvozda/nfts_data.git
!pip install -r nfts_data/requirements.txt

from ic.agent import *
from ic.identity import *
from ic.client import *
from ic.candid import Types, encode, decode

# Inicialisation
client = Client(url = "https://ic0.app")
iden = Identity()
agent= Agent(iden, client)

# Endpoint that we want to pull data from
function_to_call = 'transactions'

# List of NFTs canisters we want to pull data from
# You can find it on Entrepot clicking on NFTs
canisters = [
    {
        'name': 'Motoko',
        'id': 'oeee4-qaaaa-aaaak-qaaeq-cai'
    },
    {
        'name': 'BTC Flowers',
        'id': 'pk6rk-6aaaa-aaaae-qaazq-cai'
    },
    {
        'name': 'Poked bots',
        'id': 'bzsui-sqaaa-aaaah-qce2a-cai'
    },
]

# File to write results to
f  = open('result.txt','w')
# Header row
f.write(f"collection,index,token,icp,time_updated,timestamp,seller,buyer")

for c in canisters:
    params = []

    params = encode(params)

    response = agent.query_raw(c["id"], function_to_call, params)

    print("Getting collection:", c["name"])

    trans = response[0]["value"]
    for i,t in enumerate(trans):
        price = str(t['_3364572809']/100000000)
        timestamp = t['_1291635725']
        token = t['_338395897']
        seller = t['_1782082687']
        buyer = t['_3136747827']
        f.write(f"\n{c['name']},{i},{token},{price},,{timestamp},{seller},{buyer}")

f.close()
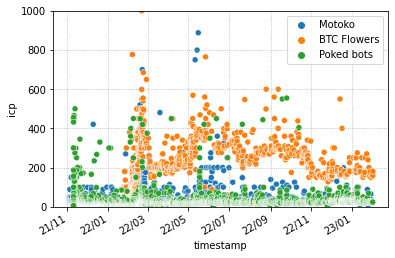
データをグラフで確認
import pandas as pd
import matplotlib.pyplot as plt
import seaborn as sns


df = pd.read_csv("result.txt", header=0)
df['timestamp'] = pd.to_datetime(df['timestamp'])

sns.scatterplot(x='timestamp', y='icp', hue='collection', legend=True, data=df)
plt.grid(linestyle='dotted')

#レジェンド
plt.legend(loc='top right')

#X軸のラベルを変更
import matplotlib.dates as mdates

plt.gca().xaxis.set_major_formatter(mdates.DateFormatter('%y/%m'))
plt.gca().xaxis.set_major_locator(mdates.MonthLocator())
plt.gca().xaxis.set_major_locator(mdates.MonthLocator(interval=2))
plt.gcf().autofmt_xdate()

#Y軸 Max1000
import matplotlib.pyplot as plt

plt.ylim(0, 1000)

plt.show()
グラフを添付してツイートする
import tweepy
import matplotlib.pyplot as plt
import pandas as pd
import seaborn as sns

df = pd.read_csv("result.txt", header=0)
df['timestamp'] = pd.to_datetime(df['timestamp'])

sns.scatterplot(x='timestamp', y='icp', hue='collection', legend=True, data=df)
plt.grid(linestyle='dotted')

#レジェンド
plt.legend(loc='top right')

#Y軸 Max1000
import matplotlib.pyplot as plt
plt.ylim(0, 1000)

#X軸のラベルを変更
import matplotlib.dates as mdates

plt.gca().xaxis.set_major_formatter(mdates.DateFormatter('%y/%m'))
plt.gca().xaxis.set_major_locator(mdates.MonthLocator(interval=2))
plt.gcf().autofmt_xdate()

plt.savefig('plot.png')


# Twitter認証情報は環境変数から取得
auth = tweepy.OAuthHandler(os.environ["TWITTER_CONSUMER_KEY"], os.environ["TWITTER_CONSUMER_SECRET"])
auth.set_access_token(os.environ["TWITTER_ACCESS_TOKEN"], os.environ["TWITTER_ACCESS_SECRET"])


# APIオブジェクトを作成
api = tweepy.API(auth)

# ツイート内容
api.update_with_media('plot.png', status='test tweet #ICP_NFT_transaction')
環境変数に以下の値を設定してください。
- TWITTER_CONSUMER_KEY
- TWITTER_CONSUMER_SECRET
- TWITTER_ACCESS_TOKEN
- TWITTER_ACCESS_SECRET
結果、以下のようなツイートなりました。
https://twitter.com/ussu_ussu_ussu/status/1620735799003168772
test tweet #ICP_NFT_transaction pic.twitter.com/580DodyGTB
— shogaku.lens(💙,🧡)🌊📘🐰🦉🛸(🌸, 🌿).eth.bit.bnb (@ussu_ussu_ussu) February 1, 2023